Importing & Exporting Data
GeoPulse provides powerful import and export capabilities to help you migrate data from other tracking platforms, back up your location history, and analyze your data in external tools. The system uses efficient streaming parsers to handle files of any size with minimal memory usage.
Accessing Import/Export
Navigate to Menu → Import/Export Data to access both import and export functionality in a tabbed interface.
Exporting Data
Export your GeoPulse data in various formats for backup, migration, or analysis in external tools.

Supported Export Formats
GeoPulse supports five export formats, each optimized for different use cases:
| Format | Description | Best For | Data Included |
|---|---|---|---|
| GeoPulse | Native format with all data types | Full backups, migration between GeoPulse instances | All data types (configurable) |
| OwnTracks | OwnTracks JSON format | Importing into OwnTracks apps | GPS data only |
| GeoJSON | Standard GIS format | GIS tools, mapping software, custom analysis | GPS data only |
| GPX | GPS Exchange Format | GPX viewers (GPXSee, QGIS), Garmin devices | GPS tracks, trips, stay waypoints |
| CSV | Comma-Separated Values | Excel, data analysis, custom scripts | GPS data with metadata |
Export Workflow
1. Select Export Format
Choose your desired format from the format options. Each format displays a description of what it's compatible with.
2. Configure Format-Specific Options
GeoPulse Format:
- Select which data types to include:
- Raw GPS Data - All location points with timestamps and accuracy
- Favorite Locations - Saved favorite places
- Reverse Geocoding Data - Cached address information
- Location Sources - GPS tracking app configurations
- User Information - Profile and preferences (excludes passwords)
- Use "Select All" or "Deselect All" for quick selection
- Note: Timeline data is not included in exports as it will be automatically regenerated from GPS data after import
GPX Format:
- Single GPX File - One file containing all tracks (raw GPS + timeline trips) and waypoints (timeline stays)
- ZIP Archive - Multiple GPX files packaged together
- Individual grouping - One file per trip/stay
- Daily grouping - All trips and stays for each day in one file
CSV Format: Exports GPS data with the following fields:
timestamp- ISO-8601 format (UTC)latitude- Decimal degreeslongitude- Decimal degreesaccuracy- GPS accuracy in meters (if available)velocity- Speed in km/h (if available)altitude- Altitude in meters (if available)battery- Battery percentage (if available)device_id- Device identifier (if available)source_type- Data source type
3. Select Date Range
Choose the time period for your export:
Preset Options:
- Last 30 Days - Recent activity
- Last 90 Days - Quarterly data
- Last Year - Annual backup
- All Time - Complete history
Custom Range: Use the date pickers to specify exact start and end dates.
4. Start Export
Click Start Export to begin the export job. The system will:
- Validate your selections
- Create an export job
- Process data in the background
- Prepare the download file
Monitoring Export Progress
Once started, you'll see a "Current Export Job" card displaying:
- Status - Pending, Processing, or Completed
- Data Types - What's being exported
- Date Range - Time period covered
- Progress Bar - Real-time completion percentage
Status Tags:
- 🔵 Pending - Job queued for processing
- 🔄 Processing - Actively exporting data
- ✅ Completed - Ready for download
Downloading Exports
When the export completes:
- A success notification appears
- Download button becomes available in the Current Export Job card
- Click Download to save the file to your computer
- Files are automatically named with timestamps (e.g.,
geopulse-export-20240115-143022.zip)
Export files are stored temporarily on the server. Download them promptly after completion.
Deleting Exports
Click the Delete button to remove an export job and free up server storage. You'll be asked to confirm this action as it cannot be undone.
Importing Data
Import location data from other tracking platforms or restore GeoPulse backups.
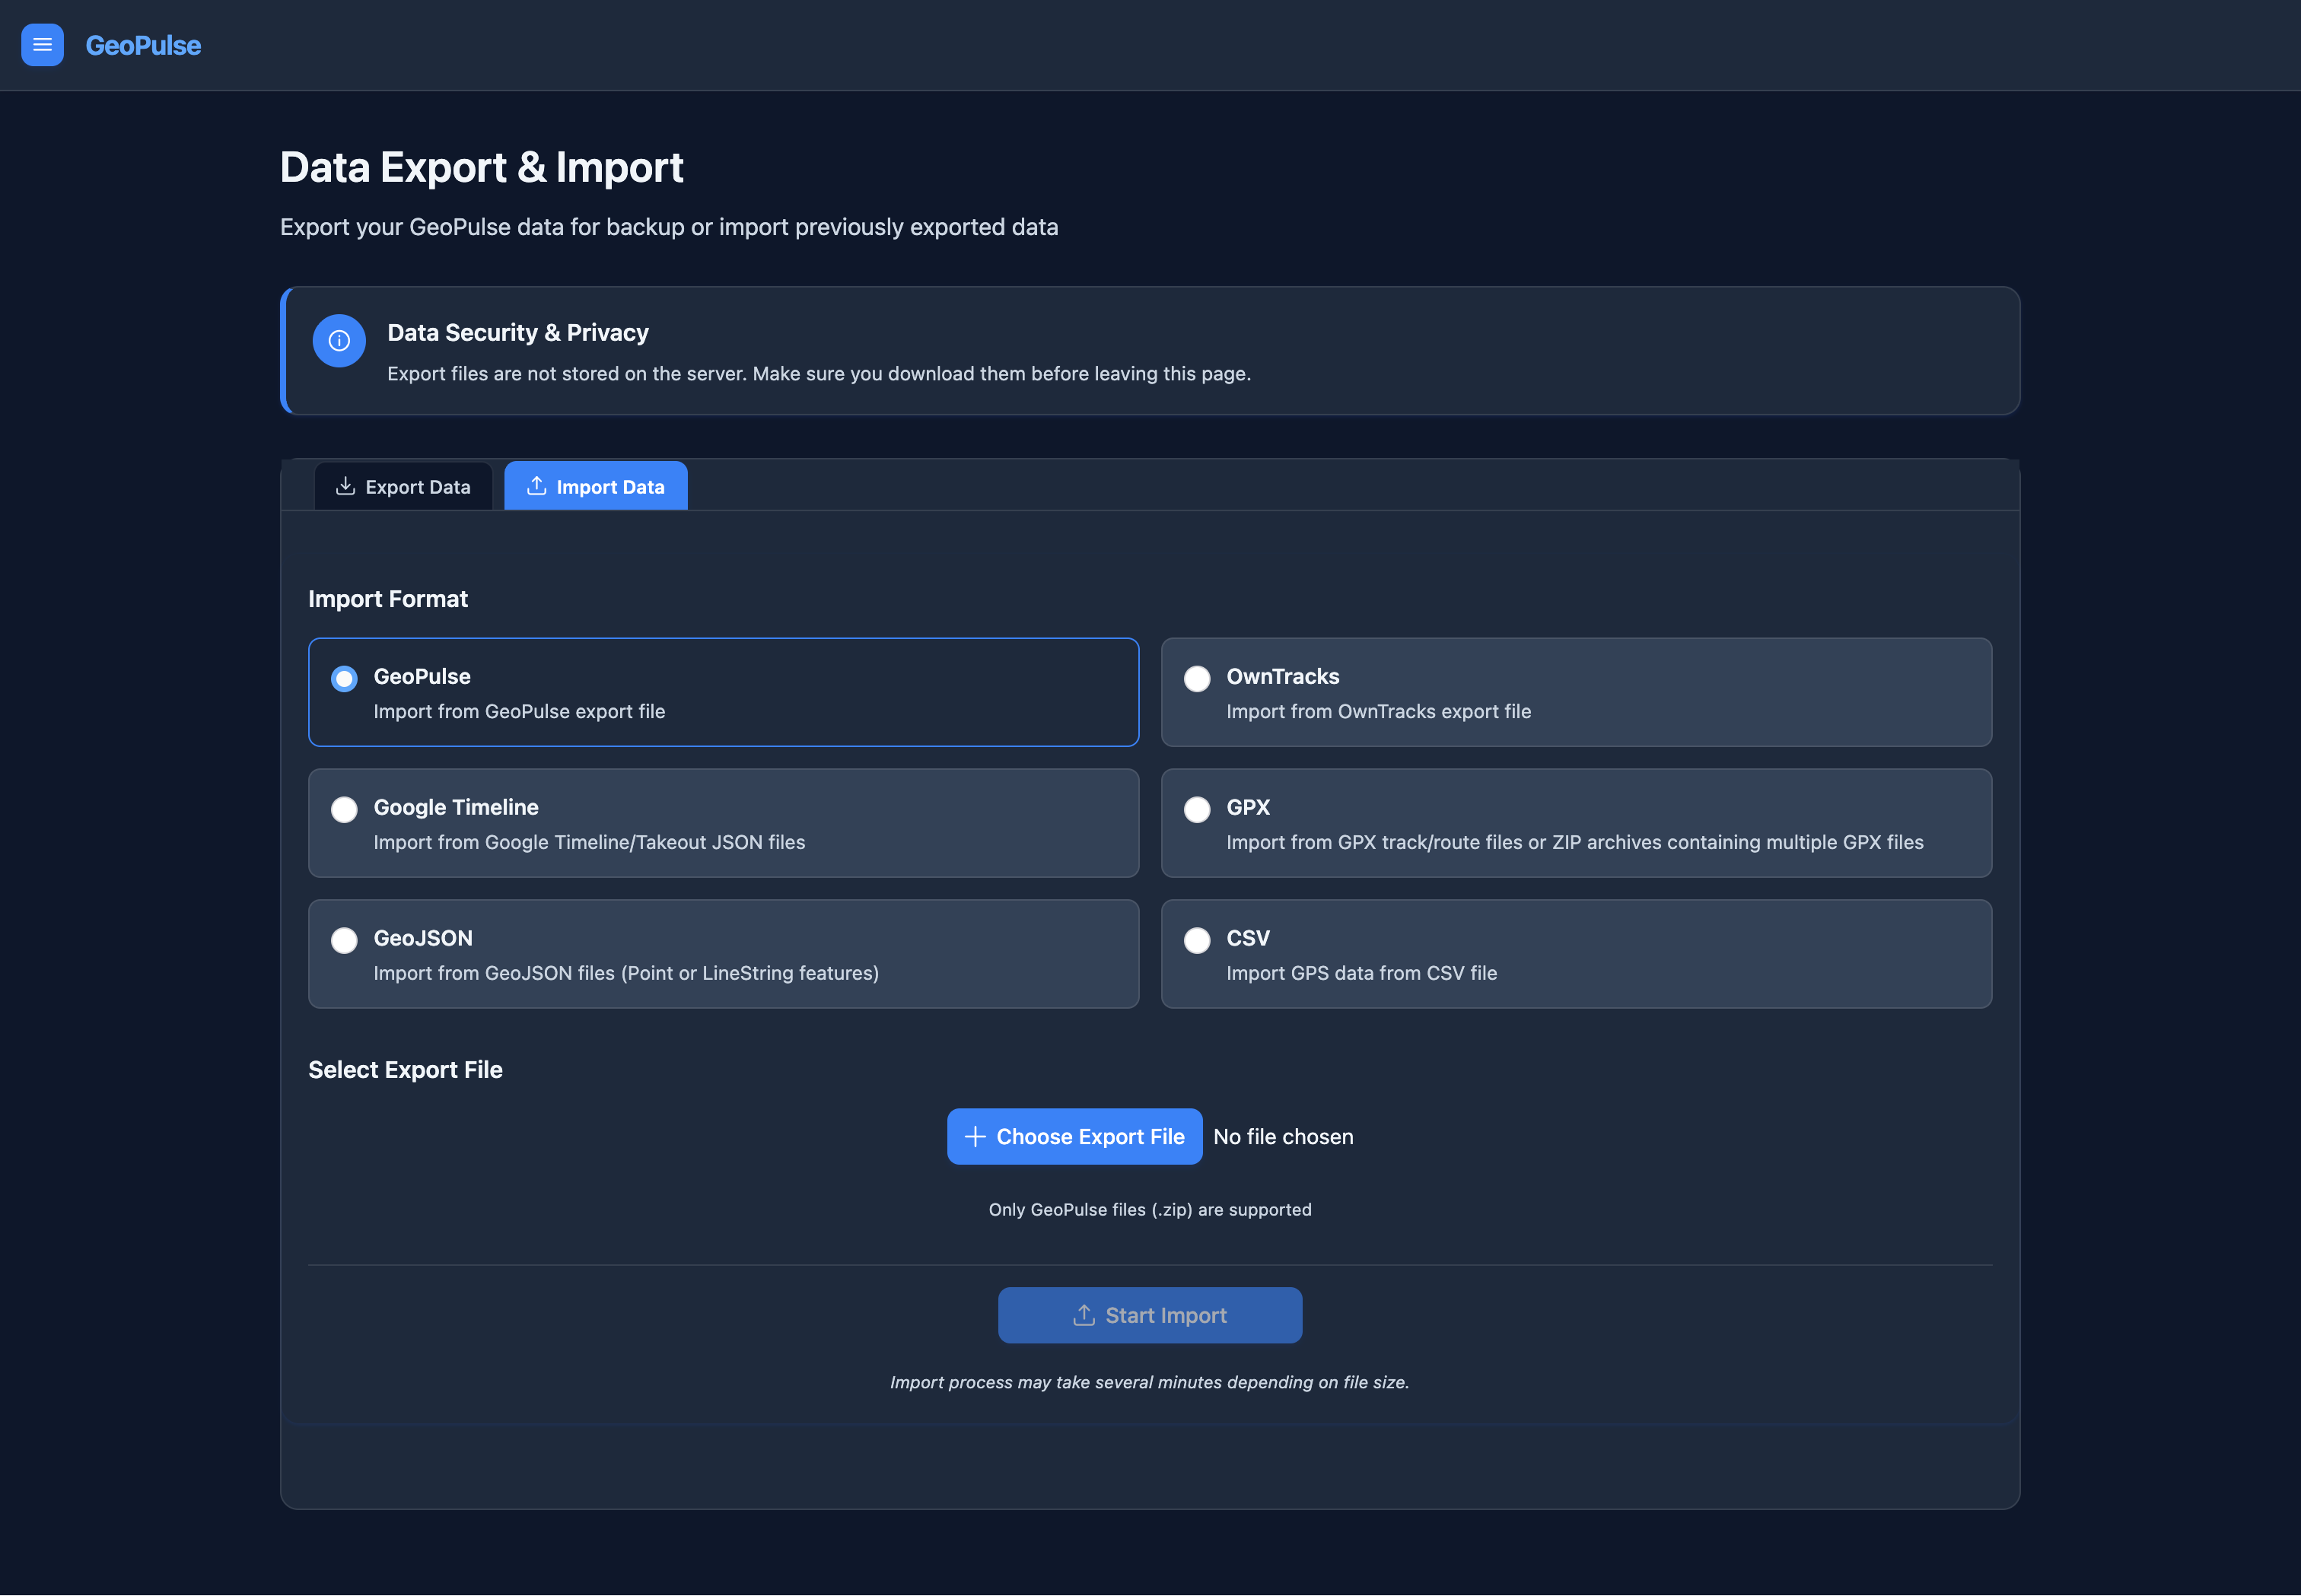
Supported Import Formats
GeoPulse can import data from six different formats:
| Format | Description | File Types | Use Case |
|---|---|---|---|
| GeoPulse | Native GeoPulse exports | .zip | Restoring backups, migrating between servers |
| OwnTracks | OwnTracks export files | .json | Migrating from OwnTracks |
| Google Timeline | Google Takeout exports | .json | Importing Google Location History |
| GPX | GPS Exchange Format | .gpx, .zip | Garmin devices, fitness trackers, GPX files |
| GeoJSON | GeoJSON Point/LineString | .json, .geojson | GIS data, custom exports |
| CSV | Structured CSV format | .csv | Custom data sources, spreadsheets |
Import Workflow�
1. Select Import Format
Choose the format that matches your source data. Each format displays:
- Accepted file types
- Description of what will be imported
2. Choose Export File
Click Choose Export File and select your file. The system validates:
- File format matches the selected import type
- File size (any size supported thanks to streaming parser)
- File structure and contents
3. Review Format-Specific Information
GeoPulse Format: Select which data types to import (same options as export). You can choose to import only specific data types from a full backup.
Other Formats (OwnTracks, Google Timeline, GPX, GeoJSON, CSV): An information message explains what data will be imported. These formats only support GPS location data.
CSV Format: When CSV is selected, you'll see:
- Download CSV Template button - Get a properly formatted template
- CSV Format Specification - Required and optional fields
- Example CSV - Sample data format
- Format Rules - Encoding, headers, and timestamp requirements
CSV Template Fields:
Required:
timestamp- ISO-8601 format (e.g., 2024-01-15T10:30:00Z)latitude- Decimal degrees (-90 to 90)longitude- Decimal degrees (-180 to 180)
Optional:
accuracy- GPS accuracy in metersvelocity- Speed in km/haltitude- Altitude in metersbattery- Battery percentage (0-100)device_id- Device identifiersource_type- Data source name
4. Configure Import Options
Import Only Data Within Date Range:
- Enable this checkbox to filter imported data by date
- Select start and end dates
- Only location points within this range will be imported
- Useful for partial imports or testing
Replace Existing Data in Time Range:
- Enabled: Deletes existing data in the import time range before importing new data
- 🧹 Cleaner data - Ensures no duplicates
- ⚠️ Warning: Permanently deletes existing data in the time range
- Use for: First-time imports or when re-importing corrected data
- Disabled: Merges new data with existing data
- Checks for duplicates before inserting
- Use for: Incremental imports or adding new data to existing timeline
5. Start Import
Click Start Import to begin. The system will:
- Upload - Transfer file to server with progress tracking
- Validate - Check file format and structure
- Process - Parse and import data using streaming parser
- Generate Timeline - Automatically create timeline items from GPS data
Drop Folder Imports (Server-Side)
GeoPulse also supports a server-side drop folder for automated imports. This is useful for headless workflows or automated pipelines.
Status: Disabled by default. You must explicitly enable it and mount the folder into the backend container.
Enable Drop Folder Imports
You can enable this in two ways:
- Admin UI (no restart): Go to Admin → Settings → Import → Drop Folder Enabled and turn it on.
- Environment variable (requires restart): Set
GEOPULSE_IMPORT_DROP_FOLDER_ENABLED=trueand restart the backend container.
If you change the drop folder path, also set GEOPULSE_IMPORT_DROP_FOLDER_PATH (default is /data/geopulse-import).
Environment Variables (All Drop Folder Options)
These settings can be configured via environment variables or the Admin UI. Changes made in the Admin UI take effect without a restart (within the next scan interval). Environment variable changes require a backend restart.
| Variable | Default | Description |
|---|---|---|
GEOPULSE_IMPORT_DROP_FOLDER_ENABLED | false | Enable/disable drop folder imports |
GEOPULSE_IMPORT_DROP_FOLDER_PATH | /data/geopulse-import | Drop folder path inside the container |
GEOPULSE_IMPORT_DROP_FOLDER_POLL_INTERVAL_SECONDS | 10 | How often to scan the drop folder |
GEOPULSE_IMPORT_DROP_FOLDER_STABLE_AGE_SECONDS | 10 | Minimum file age before import begins |
GEOPULSE_IMPORT_DROP_FOLDER_GEOPULSE_MAX_SIZE_MB | 200 | Max GeoPulse ZIP size for drop imports |
Ensure the Volume Is Mounted
Make sure the backend container has the drop folder mounted. In docker-compose.yml, you should have:
services:
  geopulse-backend:
    volumes:
      - ./import-drop:/data/geopulse-import
If your host runs SELinux (Fedora, RHEL, CentOS), bind mounts may be blocked unless you add a label. Use :Z (private label) or :z (shared label):
services:
  geopulse-backend:
    volumes:
      - ./import-drop:/data/geopulse-import:Z
How it works:
- The server watches a configurable drop folder.
- The admin must create a subfolder for each user, named exactly like the user's email (case-insensitive matching is used).
- Files placed there are picked up and imported automatically.
- Only one import runs per user at a time; additional files wait.
Example folder structure:
/data/geopulse-import/
  user@example.com/
    google-timeline-2024.json
    gpx-tracks.zip
    .failed/
      bad-file.json
      bad-file.json.error.json
What happens on success/failure:
- Success: file is deleted after the import finishes.
- Failure: file is moved to
.failed/and an.error.jsonfile is written with details.
File type detection:
- The system uses filename hints first (e.g.,
timeline,owntracks,geopulse). - If needed, it tries parsers based on file extension:
.json: OwnTracks → Google Timeline → GeoJSON (first successful parser wins).zip: GeoPulse → GPX ZIP.gpx,.geojson,.csv: direct matching
- For large GeoPulse ZIPs, a size cap applies only for drop-folder imports (default 200MB). Regular uploads are not affected.
Drop Folder Permissions
The drop folder is typically mounted from the host filesystem into the GeoPulse container. Because GeoPulse runs as a non-root container user, correct permissions must be set up on the folder before importing will work.
GeoPulse needs to read uploaded files, delete them after a successful import, move failed files into .failed/, and write .error.json error reports. This means user directories inside the drop folder must be writable and uploaded files must be readable by the GeoPulse container user (UID 1001 by default).
If Docker already created the folder
When the bind mount target does not exist, Docker creates it automatically as root:root with 0755 permissions. In that case, GeoPulse (UID 1001) can read but cannot write, so drop imports will fail. Fix the existing folder on the host:
# Align ownership with the container user (UID 1001, GID 0)
sudo chown -R 1001:0 import-drop
sudo chmod -R g+rwX import-drop
If you prefer to keep ownership, use ACLs instead (Option 3 below).
Recommended Setup
Option 1 — Run uploader services with the same UID
If you use FileBrowser or another containerized upload tool, run it with the same UID as GeoPulse. This avoids cross-user permission issues entirely.
filebrowser:
  image: filebrowser/filebrowser
  user: "1001:1001"
Option 2 — Relax directory permissions
Create the drop folder with open permissions so any service can read and write freely.
mkdir -p import-drop/user@example.com
chmod -R 777 import-drop
chmod 777 grants full access to all local users. Only use this in trusted, single-node environments.
Option 3 — Use ACLs
Grant GeoPulse access without changing file ownership. New files will automatically inherit the correct permissions.
# Grant UID 1001 access to existing files
setfacl -R -m u:1001:rwX import-drop

# Ensure future files inherit the same permissions
setfacl -R -d -m u:1001:rwX import-drop
Notes:
- Files must be stable (unchanged) for a short period before import begins.
- Configure the drop folder path and timing in the admin settings or via environment variables.
- See Import Configuration for details.
Monitoring Import Progress
The import process provides detailed progress tracking across multiple phases:
Upload Phase:
- Progress bar showing upload percentage
- File size and upload speed indicators
- Phase descriptions (Starting upload, Uploading, Finalizing)
Processing Phase: After upload, you'll see:
- Current status - Validating, Processing, or Completed
- File name - Uploaded file
- Data types - What's being imported
- Progress bar - Overall completion percentage
- Progress phases:
- Parsing import data
- Importing GPS points (bulk inserting or merging)
- Generating timeline
Timeline Generation: When GPS data import reaches ~70%, timeline generation begins automatically. You'll see:
- Timeline Generation section with its own progress bar
- Current step - What the timeline generator is doing
- Key metrics:
- GPS points loaded (e.g., "25,000 / 100,000 GPS points loaded")
- Locations geocoded (e.g., "150 / 200 locations geocoded (10 pending)")
- View Detailed Progress button - Opens timeline job details in a new tab
GeoPulse automatically analyzes your GPS data to create timeline items (trips and stays) after import. This process runs in the background and can take several minutes depending on the amount of data.
Import Completion
When the import finishes successfully:
- Success notification appears
- Import Summary displays:
- 📍 GPS points imported
- 🕒 Timeline items generated
- ❤️ Favorite locations imported
- 📱 Location sources imported
Efficient Memory Usage
GeoPulse uses streaming parsers and chunked uploads for all import operations, which means:
- ✅ Low memory usage - Data is processed in chunks, not loaded entirely into memory
- ✅ Fast processing - Efficient algorithms handle large datasets quickly
- ✅ Handles very large files - Files up to 10GB supported (configurable)
- ✅ Bypasses CDN limits - Chunked uploads work around Cloudflare's 100MB limit
- ✅ Reliable - Handles interrupted imports gracefully with resume capability
How It Works:
- Files smaller than 80MB are uploaded directly
- Larger files are automatically split into 50MB chunks on the frontend
- Chunks are reassembled on the backend before processing
- Streaming parsers process data incrementally without loading entire files into memory
File Size Limits:
- Default maximum: 10GB (configurable via
GEOPULSE_IMPORT_MAX_FILE_SIZE_GB) - Frontend (Nginx): 200MB default for direct uploads - chunked uploads bypass this
For files larger than 80MB, GeoPulse automatically uses chunked uploads. This works seamlessly behind the scenes - just select your file and the system handles the rest. See Import Configuration for advanced settings.
This architecture allows you to import years of location history with efficient memory usage.
Tips and Best Practices
For Exports
- Regular backups - Export your data monthly using GeoPulse format
- Test exports - Try exporting a small date range first to verify format compatibility
- Choose the right format:
- Full backup → GeoPulse
- GPS visualization → GPX or GeoJSON
- Data analysis → CSV
- Platform migration → Match target platform format
For Imports
- Start with small files - Test with a small date range or file first
- Use date filters - Import specific time periods to avoid overwhelming the system
- Use "Replace data" for clean imports - Recommended for first-time imports or when re-importing corrected data
- Use merge mode for incremental imports - Safer when adding new data to existing timeline
- Monitor timeline generation - Allow time for timeline processing to complete
- Verify imports - Check Timeline and GPS Data pages after import
Performance Optimization
- Large files - Files up to 10GB are supported by default (configurable up to any size). Large files use chunked uploads for reliability
- Network speed - Upload time depends on your internet connection. Chunked uploads show progress and can resume if interrupted
- Timeline generation - Can take several minutes for large datasets (years of data)
- Advanced configuration - For performance tuning, see Import Configuration
- Import mode selection:
- Replace mode: Clean slate, no duplicates, recommended for first-time imports
- Merge mode: Preserves existing data, checks for duplicates, use for incremental updates
Troubleshooting
Export Issues
Problem: Export button is disabled
Solutions:
- Ensure you've selected a date range
- For GeoPulse format, select at least one data type
- Verify start date is before end date
Problem: Export file won't download
Solutions:
- Check your browser's download settings
- Disable popup blockers
- Try a different browser
- Check available disk space
Import Issues
Problem: File upload fails
Solutions:
- Verify file format matches selected import type
- Check file isn't corrupted (try opening in appropriate app)
- Try a different browser
Problem: Upload fails with "413 Request Entity Too Large" or file size error
Solutions:
- For files >80MB, GeoPulse automatically uses chunked uploads which bypass most CDN limits
- If you still see this error, check if your file exceeds the 10GB default maximum
- The maximum can be increased via
GEOPULSE_IMPORT_MAX_FILE_SIZE_GB(see Import Configuration) - For direct (non-chunked) uploads of small files, you may need to adjust
CLIENT_MAX_BODY_SIZE(see Frontend Configuration)
Problem: Import stuck at "Validating"
Solutions:
- Wait 1-2 minutes - validation can take time for large files
- Check file format is correct
- Verify file isn't corrupted
- For CSV, ensure headers match template exactly
Problem: Timeline generation takes very long
Solutions:
- This is normal for large datasets - can take 30+ minutes for years of data
- Click "View Detailed Progress" to see what's happening
- Don't close the browser - job continues on server
- You can navigate away and come back later
Problem: CSV import fails with format error
Solutions:
- Download and use the CSV template
- Verify timestamps are in ISO-8601 format with Z suffix (UTC)
- Check latitude/longitude are in decimal degrees
- Ensure file is UTF-8 encoded
- Verify header row is present and matches template
Problem: Duplicate data after import
Solutions:
- If you see duplicates, enable "Replace existing data in time range" for your next import
- To clean up duplicates, export data and re-import with replace mode enabled
- Use date range filters to target specific periods
Data Format Details
GeoPulse Format Structure
The GeoPulse export is a ZIP file containing JSON files for each data type:
geopulse-export-20240115.zip
├── rawgps.json
├── favorites.json
├── reversegeocodinglocation.json
├── locationsources.json
└── userinfo.json
Each JSON file contains an array of records in GeoPulse's internal format.
GPX Export Structure
Single File Mode:
<?xml version="1.0"?>
<gpx>
  <trk>
    <name>Raw GPS Track</name>
    <trkseg>
      <trkpt lat="37.7749" lon="-122.4194">
        <time>2024-01-15T10:30:00Z</time>
      </trkpt>
    </trkseg>
  </trk>
  <wpt lat="37.7750" lon="-122.4195">
    <name>Stay Point</name>
    <time>2024-01-15T10:30:00Z</time>
  </wpt>
</gpx>
ZIP Archive Mode:
geopulse-export-20240115.zip
├── 2024-01-15/
│   ├── trip-morning-commute.gpx
│   ├── stay-home.gpx
│   └── trip-evening-commute.gpx
└── 2024-01-16/
    └── trip-weekend-hike.gpx
CSV Format Example
timestamp,latitude,longitude,accuracy,velocity,altitude,battery,device_id,source_type
2024-01-15T10:30:00Z,37.7749,-122.4194,10.5,5.2,100.0,85.0,device123,CSV
2024-01-15T10:35:00Z,37.7750,-122.4195,8.3,12.8,105.2,84.8,,CSV
2024-01-15T10:40:00Z,37.7751,-122.4196,,15.5,,,device789,GPX
Supported GeoJSON Features
GeoPulse imports GeoJSON files with:
- Point features - Individual location points
- LineString features - Tracks/routes (converted to points)
Example:
{
  "type": "FeatureCollection",
  "features": [
    {
      "type": "Feature",
      "geometry": {
        "type": "Point",
        "coordinates": [-122.4194, 37.7749]
      },
      "properties": {
        "timestamp": "2024-01-15T10:30:00Z"
      }
    }
  ]
}
Frequently Asked Questions
Q: What's the maximum file size for imports? A: The default maximum is 10GB, which can be increased via configuration. GeoPulse uses chunked uploads for large files, automatically splitting them into smaller pieces to bypass CDN limits like Cloudflare's 100MB restriction. See Import Configuration for details on adjusting limits.
Q: Can I import data while the system is still processing a previous import? A: No, GeoPulse processes one import job at a time per user to ensure data integrity. Wait for the current job to complete before starting another.
Q: Will importing data delete my existing location history? A: Only if you enable "Replace existing data in time range." Otherwise, data is merged with duplicate detection.
Q: How long are export files stored on the server? A: Export files are temporary. Download them promptly after creation. The system may clean up old exports after a period of time.
Q: Can I schedule automatic exports? A: Not currently through the web interface. However, you can use the GeoPulse API to create automated backup scripts.
Q: Does importing GPS data automatically create timeline items? A: Yes! GeoPulse automatically analyzes imported GPS data and generates timeline items (trips and stays). This process happens after GPS import and is tracked with detailed progress.
Q: What happens if my import fails midway? A: The system tracks import progress. If an import fails, you can restart it. If "Replace existing data" was enabled, the database transaction ensures either all data is imported or none is.
Q: Can I import data from multiple sources? A: Yes! Import files from different sources sequentially. GeoPulse will merge them intelligently, using timestamps to organize your complete location history.
Q: Which format should I use for backing up my data? A: Use the GeoPulse format with all data types selected. This ensures you have a complete backup that can be fully restored.
Q: Why does GPX export include both tracks and waypoints? A: Tracks represent continuous movement (trips and raw GPS data), while waypoints represent stay points. This provides a complete picture of your activity in GPX viewers like GPXSee.